Windows Mail/en
Aus EUserv Wiki
Root (Diskussion | Beiträge) (Die Seite wurde neu angelegt: „{{Languages|Windows Mail}} Kategorie:Email/en == Email account setup== ---- When setting up Windows Mail for the first time you will be supported by a Wiza…“) |
Svtr1 (Diskussion | Beiträge) |
||
| (Der Versionsvergleich bezieht 7 dazwischenliegende Versionen mit ein.) | |||
| Zeile 1: | Zeile 1: | ||
{{Languages|Windows Mail}} | {{Languages|Windows Mail}} | ||
| - | [[Kategorie:Email/en]] | + | [[Kategorie:Email setup]] |
| + | [[Kategorie:Service_%2B_Support/en]] | ||
| + | '''''Windows Mail''''' | ||
| + | __TOC__ | ||
| + | = Windows Mail = | ||
| + | |||
| + | ''This version of Windows Mail is outdated. For the latest version of Windows Mail you will find the Wiki guide [[Windows_Live_Mail_2012/en | here]]. | ||
== Email account setup== | == Email account setup== | ||
| - | |||
| - | |||
| - | |||
When setting up Windows Mail for the first time you will be supported by a Wizard. You can reach the Wizard alternatively by selecting "Tools -> Accounts" and clicking "Add" subsequently: | When setting up Windows Mail for the first time you will be supported by a Wizard. You can reach the Wizard alternatively by selecting "Tools -> Accounts" and clicking "Add" subsequently: | ||
| - | + | <center> | |
[[Datei:winmail1.gif]] | [[Datei:winmail1.gif]] | ||
| - | + | </center> | |
Choose "E-Mail Account here" and click '''"Next"''' to proceed. | Choose "E-Mail Account here" and click '''"Next"''' to proceed. | ||
Now enter your name: | Now enter your name: | ||
| - | + | <center> | |
[[Datei:winmail2.gif]] | [[Datei:winmail2.gif]] | ||
| - | + | </center> | |
Click '''"Next"''' to proceed. | Click '''"Next"''' to proceed. | ||
Enter your complete eMail address which you have set up in the customer center before: | Enter your complete eMail address which you have set up in the customer center before: | ||
| - | + | <center> | |
[[Datei:winmail3.gif]] | [[Datei:winmail3.gif]] | ||
| - | + | </center> | |
Click '''"Next"''' to proceed. | Click '''"Next"''' to proceed. | ||
| Zeile 29: | Zeile 32: | ||
Also make the tick in the field '''"My server requires authentication"'''. | Also make the tick in the field '''"My server requires authentication"'''. | ||
| - | + | <center> | |
[[Datei:winmail4-euserv.gif]] | [[Datei:winmail4-euserv.gif]] | ||
| - | + | </center> | |
Click '''"Next"''' to proceed. | Click '''"Next"''' to proceed. | ||
Finally enter the eMail accounts username and the correspondingf password into the field '''"E-mail username"'''. Please use the values you can find in the customer center under "Email-Accounts". | Finally enter the eMail accounts username and the correspondingf password into the field '''"E-mail username"'''. Please use the values you can find in the customer center under "Email-Accounts". | ||
| - | + | <center> | |
[[Datei:winmail5.gif]] | [[Datei:winmail5.gif]] | ||
| - | + | </center> | |
Click '''"Next"''' to proceed; finally click "Finish" to complete the setup. | Click '''"Next"''' to proceed; finally click "Finish" to complete the setup. | ||
Aktuelle Version vom 17:00, 7. Nov. 2014
| | Languages: |
Deutsch |
Windows Mail
Inhaltsverzeichnis |
Windows Mail
This version of Windows Mail is outdated. For the latest version of Windows Mail you will find the Wiki guide here.
Email account setup
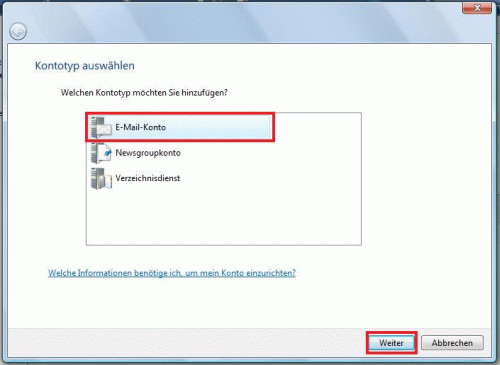
When setting up Windows Mail for the first time you will be supported by a Wizard. You can reach the Wizard alternatively by selecting "Tools -> Accounts" and clicking "Add" subsequently:
Choose "E-Mail Account here" and click "Next" to proceed.
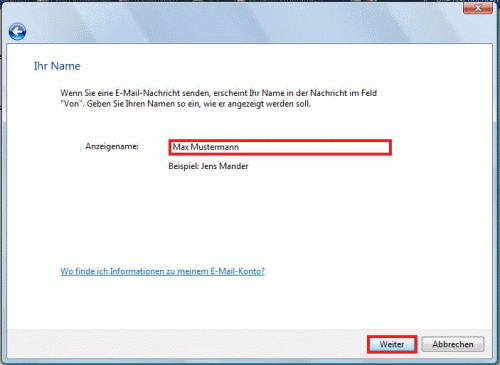
Now enter your name:
Click "Next" to proceed.
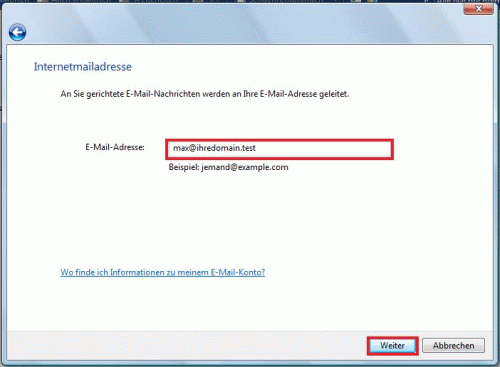
Enter your complete eMail address which you have set up in the customer center before:
Click "Next" to proceed.
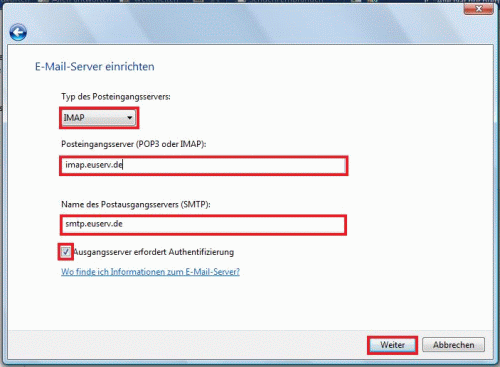
Choose a Server Type you want to use. We recommend using IMAP, in case you tariff supports this option.
Enter the Incoming and Outgoing mail server. The values which have to be entered can be found in the customer center under "Email-Accounts".
Also make the tick in the field "My server requires authentication".
Click "Next" to proceed.
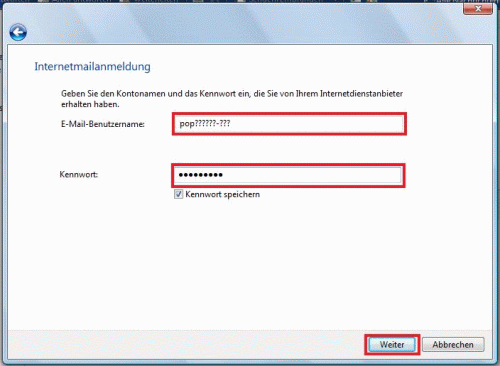
Finally enter the eMail accounts username and the correspondingf password into the field "E-mail username". Please use the values you can find in the customer center under "Email-Accounts".
Click "Next" to proceed; finally click "Finish" to complete the setup.

