Kundencenter Webspace Formmailer/en
Aus EUserv Wiki
Root (Diskussion | Beiträge) (→Form Mailer) |
|||
| Zeile 7: | Zeile 7: | ||
</div> | </div> | ||
== General== | == General== | ||
| - | If you | + | If you have an EUserv webspace, you have the opportunity to use form mailer for your website. |
A Form Mailer is a contact form for your website. A contact form that your visitors have the opportunity to get in touch with you without having to reveal your email address directly. This protects you from spam. | A Form Mailer is a contact form for your website. A contact form that your visitors have the opportunity to get in touch with you without having to reveal your email address directly. This protects you from spam. | ||
| - | == Form Mailer== | + | == Form Mailer == |
| - | In EUserv customer center, you have the ability to create Form | + | In EUserv customer center, you have the ability to create Form Mailer. |
| - | + | Choose your webspace contract for which you want to create the Form Mailer. | |
<br> | <br> | ||
<br> | <br> | ||
| Zeile 23: | Zeile 23: | ||
<br> | <br> | ||
<br> | <br> | ||
| - | Once you have selected your webspace contract, now click on the menu item " | + | Once you have selected your webspace contract, now click on the menu item "Formmailer" under Webspace. |
<br> | <br> | ||
<br> | <br> | ||
| Zeile 31: | Zeile 31: | ||
<br> | <br> | ||
<br> | <br> | ||
| - | Here you can set up your webspace | + | Here you can set up your webspace form mailer. The overview "Formmailer" to itemize you on how many available tariff you have in your Form Mailer, how many Form Mailer you have already created, which Recipient's email address, the individual form mailer and a comment box where you yourself can specify a note. By clicking on "Anlegen" under "Einen neuen Formmailer" to open the corresponding menu. |
<br> | <br> | ||
<br> | <br> | ||
| Zeile 39: | Zeile 39: | ||
<br> | <br> | ||
<br> | <br> | ||
| - | === Form Mail | + | |
| - | In this part of the | + | === Setting Up the Form Mail === |
| + | |||
| + | In this part of the EUserv customer center, you can create the desired Form Mailer. In the "Empfängername" you can enter the name of the recipient of the email. Normally, that's your name. Under "Empfängeremail" enter the email address to which the form of mail messages are sent. Logically, you should have access to that email address. It lends itself well to this, create a separate mailbox (e.g., info@meinedomain.de). With the field "Return-URL" to specify on which side your visitors are led by successful filling of the form mailer (e.g., "http://www.meinedomain.de/danke.html"). On "Feld 1-5" you can display various information, which are the queries relevance to you (e.g., Name, Adresse, Email, etc.). These fields can be automatically entered in the email that is sent to you. In this field "Textkörper" with the command {{feldx}} is implemented (where x is the field number). You can supplement this with text of your choice, to be included automatically in any form mail. By "Komment" you write a personal comment in order to identify every form mailer right away. Clicking on "Save" to confirm your settings. | ||
<br> | <br> | ||
<br> | <br> | ||
| Zeile 48: | Zeile 50: | ||
<br> | <br> | ||
<br> | <br> | ||
| - | On the overview page of the form mailer appears in the table. The fact indicated | + | On the overview page of the form mailer appears in the table. The fact indicated Web_ID ensures that every page visit is automatically assigned to the correct form mailer. This Web_ID is also found in the source code of the form mailer again, which you get if you click on "Anzeigen" under "Quellcode" and copy this in your homepage source code. |
<br> | <br> | ||
<br> | <br> | ||
| Zeile 61: | Zeile 63: | ||
<br> | <br> | ||
<br> | <br> | ||
| + | |||
=== Form Mailer edit/delete=== | === Form Mailer edit/delete=== | ||
| - | + | ||
| + | To change the options, click on the overview page "Formmailer" right next to the desired Formmailer on "Ändern". If do you want to delete a Formmailer again, just click on "Löschen". | ||
<br> | <br> | ||
<br> | <br> | ||
Version vom 13:54, 4. Okt. 2012
| | Languages: |
Deutsch |
Creating Form Mailer
Inhaltsverzeichnis |
Creating Form Mailer
General
If you have an EUserv webspace, you have the opportunity to use form mailer for your website.
A Form Mailer is a contact form for your website. A contact form that your visitors have the opportunity to get in touch with you without having to reveal your email address directly. This protects you from spam.
Form Mailer
In EUserv customer center, you have the ability to create Form Mailer.
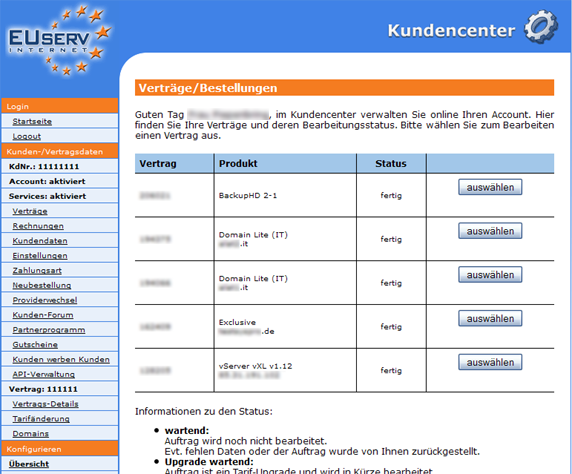
Choose your webspace contract for which you want to create the Form Mailer.
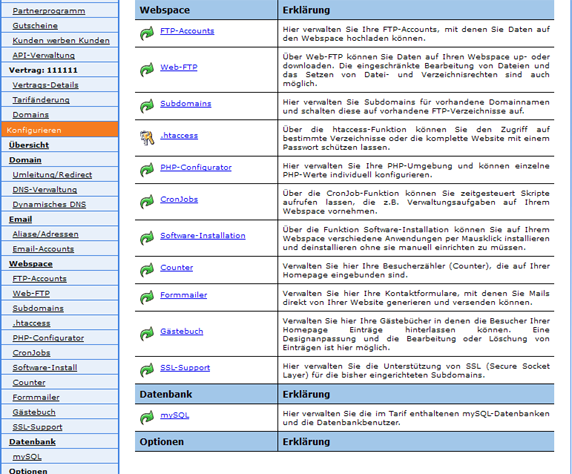
Once you have selected your webspace contract, now click on the menu item "Formmailer" under Webspace.
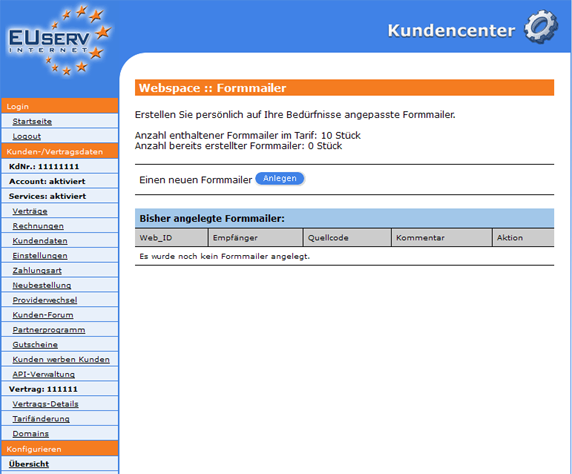
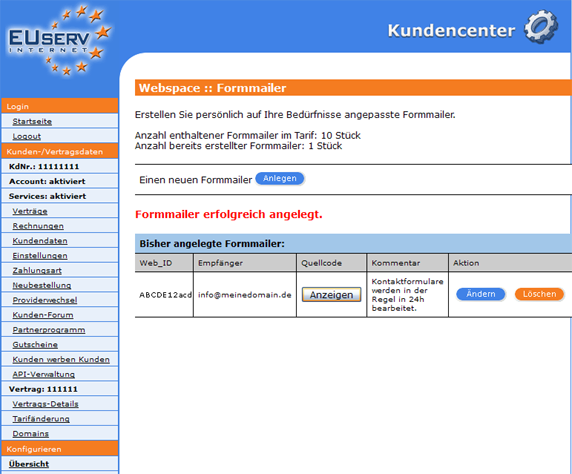
Here you can set up your webspace form mailer. The overview "Formmailer" to itemize you on how many available tariff you have in your Form Mailer, how many Form Mailer you have already created, which Recipient's email address, the individual form mailer and a comment box where you yourself can specify a note. By clicking on "Anlegen" under "Einen neuen Formmailer" to open the corresponding menu.
Setting Up the Form Mail
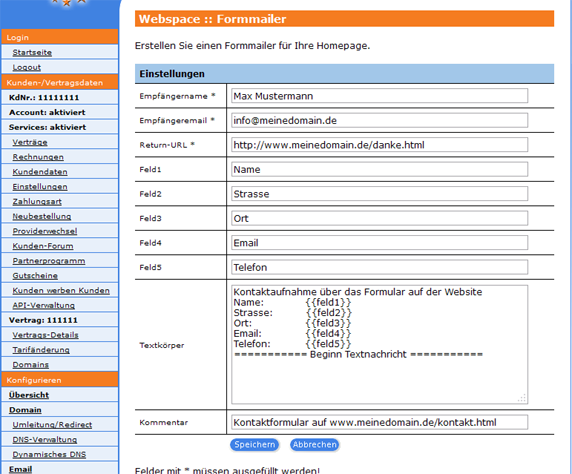
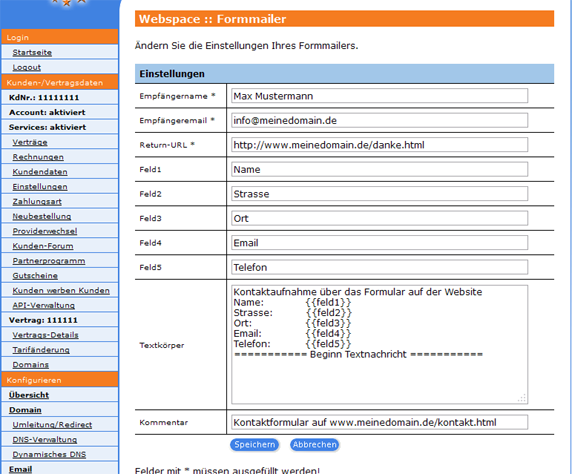
In this part of the EUserv customer center, you can create the desired Form Mailer. In the "Empfängername" you can enter the name of the recipient of the email. Normally, that's your name. Under "Empfängeremail" enter the email address to which the form of mail messages are sent. Logically, you should have access to that email address. It lends itself well to this, create a separate mailbox (e.g., info@meinedomain.de). With the field "Return-URL" to specify on which side your visitors are led by successful filling of the form mailer (e.g., "http://www.meinedomain.de/danke.html"). On "Feld 1-5" you can display various information, which are the queries relevance to you (e.g., Name, Adresse, Email, etc.). These fields can be automatically entered in the email that is sent to you. In this field "Textkörper" with the command Vorlage:Feldx is implemented (where x is the field number). You can supplement this with text of your choice, to be included automatically in any form mail. By "Komment" you write a personal comment in order to identify every form mailer right away. Clicking on "Save" to confirm your settings.
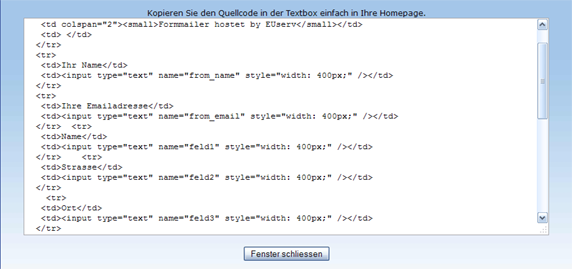
On the overview page of the form mailer appears in the table. The fact indicated Web_ID ensures that every page visit is automatically assigned to the correct form mailer. This Web_ID is also found in the source code of the form mailer again, which you get if you click on "Anzeigen" under "Quellcode" and copy this in your homepage source code.
Form Mailer edit/delete
To change the options, click on the overview page "Formmailer" right next to the desired Formmailer on "Ändern". If do you want to delete a Formmailer again, just click on "Löschen".

