Manual VNC-Installation SUSE Linux Enterprise Server 12/en
Aus EUserv Wiki
Almi1 (Diskussion | Beiträge) (Die Seite wurde neu angelegt: „Kategorie:Betriebssysteme und Software/en {{Languages|Manual VNC-Installation SUSE Linux Enterprise Server 12}} '''''Manual VNC-Installation SUSE Linux Enterp…“) |
Almi1 (Diskussion | Beiträge) |
||
| Zeile 6: | Zeile 6: | ||
'''Manual VNC-Installation SUSE Linux Enterprise Server 12''' | '''Manual VNC-Installation SUSE Linux Enterprise Server 12''' | ||
</div> | </div> | ||
| - | == | + | == General == |
| - | + | EUserv provides the comfortable VNC installation for the operating system '''SUSE Linux Enterprise Server 12'''. With this you are able to install SLES 12 using a graphical install wizard and adjust the installation to your liking. You will need a VNC viewer for the installation. Windows users can try UltraVNC or RealVNC for this purpose. Linux users can use Vinagre or TightVNC for instance. | |
| - | == | + | == Preparing the installation == |
| - | + | To activate the VNC installation for SLES 12, proceed as follows: | |
| + | *Log in to the EUserv customer center. | ||
| - | * | + | *Choose your server contract and click '''Re-Installation''' from the left menu. |
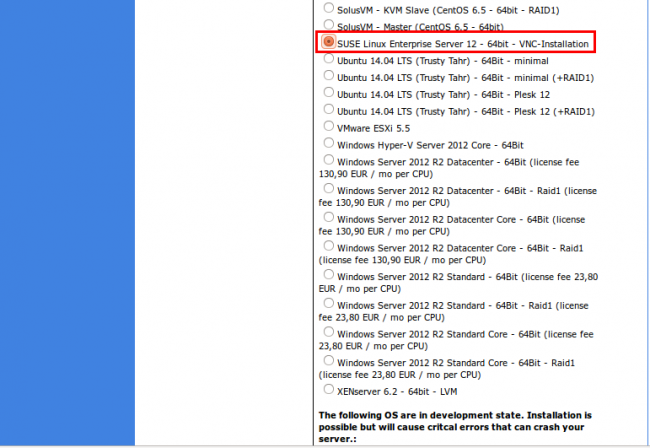
| - | * | + | *Select the appropriate OS from the list and click '''Start Reinstallation''' (executing installation) from below. Make sure to set the tick at '''Confirm Reinstallation'''. The Re-installation is now being processed: |
| - | |||
<br> | <br> | ||
<br> | <br> | ||
| Zeile 27: | Zeile 27: | ||
<br> | <br> | ||
<br> | <br> | ||
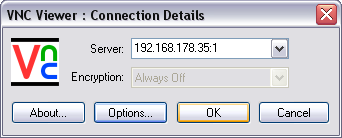
| - | * | + | *After approximately 10 minutes you can connect with the server using a VNC viewer. Under '''Server''' enter your server's IP. You can find it in the customer center under '''Serverdata'''. The required port is '''5901'''. It doesn't matter whether you enter ''':5901''' or ''':1'''. The only thing important is the colon between the IP and the port. In this example we are using the '''RealVNC''' viewer and confirm our input by clicking '''OK''': |
<br /> | <br /> | ||
| Zeile 37: | Zeile 37: | ||
<br /> | <br /> | ||
| - | + | You now will be prompted to enter your server password for authentication. This is the default password you can find in the customer center under '''Serverdata'''. Also confirm the input with '''OK''': | |
<center> | <center> | ||
| Zeile 43: | Zeile 43: | ||
</center> | </center> | ||
| - | + | ||
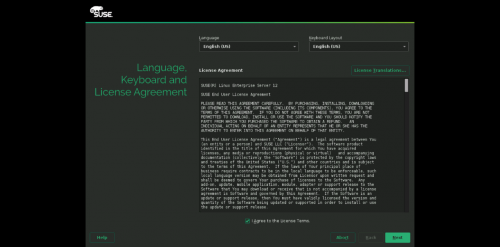
| + | You should now be connected with the server and see the following screen: | ||
<center> | <center> | ||
| Zeile 49: | Zeile 50: | ||
</center> | </center> | ||
| - | == | + | == The installation == |
| - | + | You are now able to navigate through the installation by using your mouse and keyboard. The installation process consists of the following: | |
| - | === | + | === Registration === |
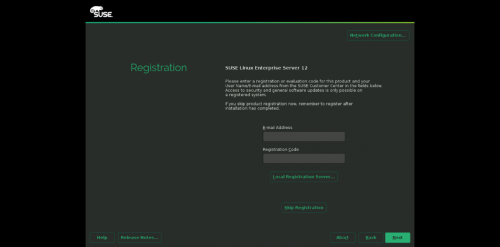
| - | + | Enter your mail address and your registration code her. Click '''Next''' to procedd. If you want to register later click '''Skip Registration''': | |
| Zeile 61: | Zeile 62: | ||
[[Datei:sles2_en.png|500px]] | [[Datei:sles2_en.png|500px]] | ||
</center> | </center> | ||
| + | |||
=== Add-Ons === | === Add-Ons === | ||
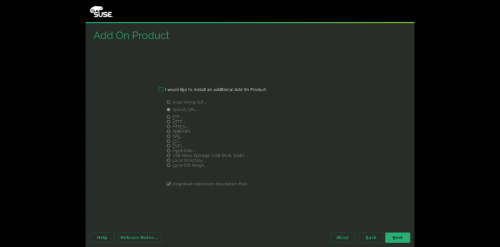
| - | + | Here you can have the installer use additional software and modules for SLES. To do so choose '''I would like to install an additional Add On Product''' and enter the respective URL. Proceed by clicking '''Next''': | |
| Zeile 71: | Zeile 73: | ||
</center> | </center> | ||
| - | === | + | === Partitioning === |
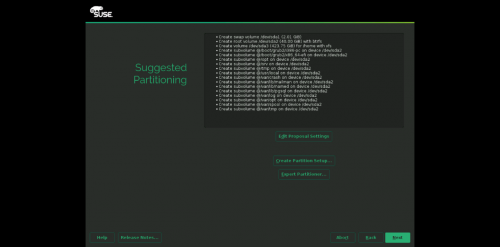
| - | + | In the following window you can partition your hard disk(s). By default the installer proposes a swap, a root (btrfs) and a home partition (xfs). In order to create snapshots the installer creates additional subvolumes. You can also use a customized partitoning layout by clicking '''Expert Partitioner...'''. | |
| - | + | Again, click '''Next''' to proceed: | |
| Zeile 82: | Zeile 84: | ||
</center> | </center> | ||
| - | === | + | === Time Zone === |
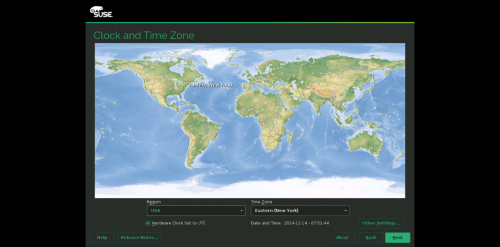
| - | + | You'll now have to set your time zone. Use the correct values from the '''Region''' and '''Time Zone''' lists: | |
| Zeile 92: | Zeile 94: | ||
| - | === | + | === User === |
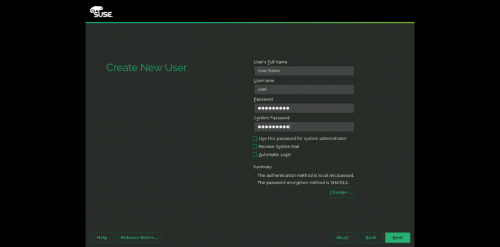
| - | + | You now have the opportunity to create an additional user account (beside the '''root''' user). Fill in the required fields. In case you don't want to create an additional user just click '''Next''': | |
| Zeile 101: | Zeile 103: | ||
</center> | </center> | ||
| - | === Root | + | === Root password === |
| - | + | ||
| - | + | ||
| + | Please enter the root password and confirm it by re-entering. After that proceed with '''Next''': | ||
<center> | <center> | ||
| Zeile 113: | Zeile 114: | ||
=== Installation === | === Installation === | ||
| - | + | The installer now shows you a summary of all the settings it will apply during the installation. Here you have the last opportunity to change your settings (software, enabling/disabling SSH, VNC etc.). Click '''Install''' to perform the installation. | |
| - | + | After the installation has been completed you are presented with a message that the system will reboot.: | |
| Zeile 123: | Zeile 124: | ||
| - | + | Depending on the settings of the installer you can connect to your server via SSH and/or VNC after it has rebooted. | |
Version vom 15:18, 14. Nov. 2014
| | Languages: |
Deutsch |
Manual VNC-Installation SUSE Linux Enterprise Server 12
Inhaltsverzeichnis |
Manual VNC-Installation SUSE Linux Enterprise Server 12
General
EUserv provides the comfortable VNC installation for the operating system SUSE Linux Enterprise Server 12. With this you are able to install SLES 12 using a graphical install wizard and adjust the installation to your liking. You will need a VNC viewer for the installation. Windows users can try UltraVNC or RealVNC for this purpose. Linux users can use Vinagre or TightVNC for instance.
Preparing the installation
To activate the VNC installation for SLES 12, proceed as follows:
- Log in to the EUserv customer center.
- Choose your server contract and click Re-Installation from the left menu.
- Select the appropriate OS from the list and click Start Reinstallation (executing installation) from below. Make sure to set the tick at Confirm Reinstallation. The Re-installation is now being processed:
- After approximately 10 minutes you can connect with the server using a VNC viewer. Under Server enter your server's IP. You can find it in the customer center under Serverdata. The required port is 5901. It doesn't matter whether you enter :5901 or :1. The only thing important is the colon between the IP and the port. In this example we are using the RealVNC viewer and confirm our input by clicking OK:
You now will be prompted to enter your server password for authentication. This is the default password you can find in the customer center under Serverdata. Also confirm the input with OK:
You should now be connected with the server and see the following screen:
The installation
You are now able to navigate through the installation by using your mouse and keyboard. The installation process consists of the following:
Registration
Enter your mail address and your registration code her. Click Next to procedd. If you want to register later click Skip Registration:
Add-Ons
Here you can have the installer use additional software and modules for SLES. To do so choose I would like to install an additional Add On Product and enter the respective URL. Proceed by clicking Next:
Partitioning
In the following window you can partition your hard disk(s). By default the installer proposes a swap, a root (btrfs) and a home partition (xfs). In order to create snapshots the installer creates additional subvolumes. You can also use a customized partitoning layout by clicking Expert Partitioner....
Again, click Next to proceed:
Time Zone
You'll now have to set your time zone. Use the correct values from the Region and Time Zone lists:
User
You now have the opportunity to create an additional user account (beside the root user). Fill in the required fields. In case you don't want to create an additional user just click Next:
Root password
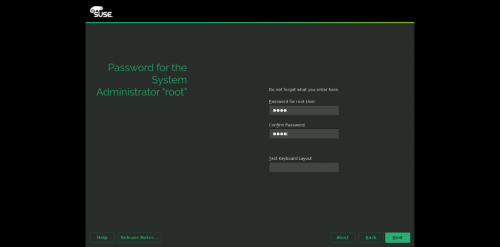
Please enter the root password and confirm it by re-entering. After that proceed with Next:
Installation
The installer now shows you a summary of all the settings it will apply during the installation. Here you have the last opportunity to change your settings (software, enabling/disabling SSH, VNC etc.). Click Install to perform the installation.
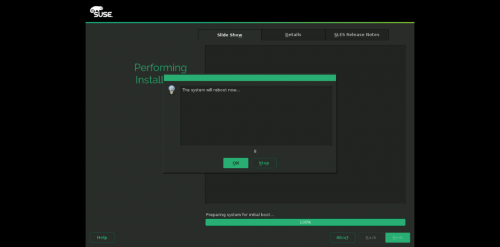
After the installation has been completed you are presented with a message that the system will reboot.:
Depending on the settings of the installer you can connect to your server via SSH and/or VNC after it has rebooted.

