Manual Windows Rescue System/en
Aus EUserv Wiki
Root (Diskussion | Beiträge) (→General) |
Svtr1 (Diskussion | Beiträge) |
||
| (Der Versionsvergleich bezieht 10 dazwischenliegende Versionen mit ein.) | |||
| Zeile 1: | Zeile 1: | ||
| - | [[Kategorie: | + | [[Kategorie:Rescue system]] |
| + | [[Kategorie:Servers]] | ||
{{Languages|Manual Windows_Rescue System}} | {{Languages|Manual Windows_Rescue System}} | ||
'''''Manual Windows Rescue System''''' | '''''Manual Windows Rescue System''''' | ||
| Zeile 8: | Zeile 9: | ||
=General= | =General= | ||
| - | For server on which the operating system Windows Server is installed, we offer the Windows Rescue System. This offers you | + | For server on which the operating system "Windows Server" is installed, we offer the Windows Rescue System. This system offers you tools in case of problem, for example to secure critical data or check the hard drive for viruses. To activate the Windows Rescue System, proceed as follows: |
<center> | <center> | ||
| Zeile 15: | Zeile 16: | ||
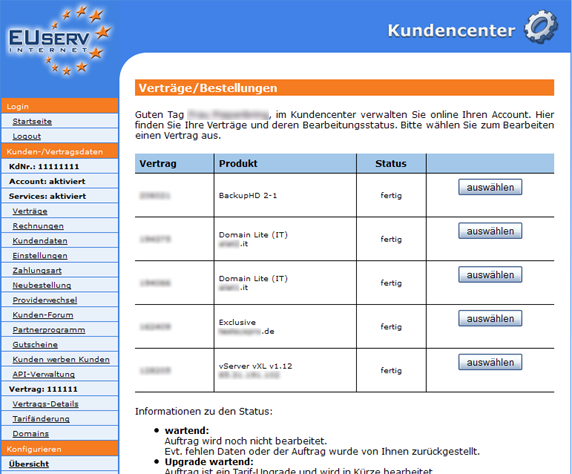
| - | Login | + | Login into the customer service center and select your server contract. |
| Zeile 21: | Zeile 22: | ||
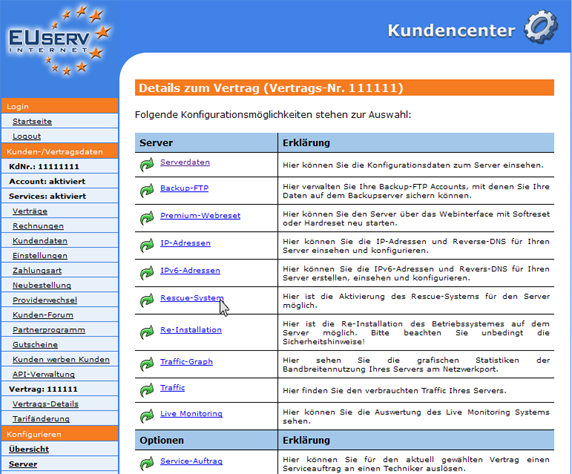
| - | + | Choose "Rescue-System" in the left menu. | |
[[Datei:winrescue6.png|framed]] | [[Datei:winrescue6.png|framed]] | ||
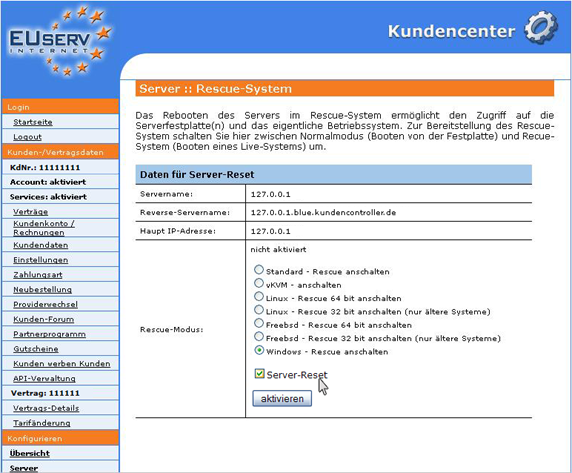
| - | Choose | + | Choose the entry for the Windows Rescue System from the list and set the hook below <br> '''server reset'''. If you click '''activate''', your server will be restarted in the Windows Rescue mode. |
</center> | </center> | ||
| - | = | + | = Connecting with the server = |
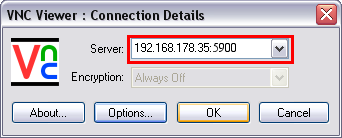
| - | After about 15 minutes you can connect | + | After about 15 minutes you can connect to the server by using VNC. In this example we use the VNC viewer from '''RealVNC'''. Enter under '''Server:''' the main IP address of your server followed by ''':0''' or ''':5900''' (Port of the Windows rescue system). <br> |
| - | + | Click on '''OK.''' The viewer will connect to your server: | |
<br> | <br> | ||
<br> | <br> | ||
| Zeile 40: | Zeile 41: | ||
<br> | <br> | ||
<br> | <br> | ||
| - | + | Enter your password. Please use the '''Default-Serverpasswort''', which you can find in the customer service center below '''Serverdaten''': | |
<br> | <br> | ||
<br> | <br> | ||
| Zeile 58: | Zeile 59: | ||
The Window shows you the available options. | The Window shows you the available options. | ||
| - | = Options of the Windows | + | = Options of the Windows Rescue System = |
== FreeCommander == | == FreeCommander == | ||
| Zeile 70: | Zeile 71: | ||
<br> | <br> | ||
<br> | <br> | ||
| - | === Creating a backup to FTP backup === | + | === Creating and restoring a backup to FTP backup === |
| - | + | ==== Creating a backup to FTP backup ==== | |
To make a backup of your personal settings, proceed as follows: | To make a backup of your personal settings, proceed as follows: | ||
| - | * Connect with your FTP backup space. Click on the ''FTP'' icon. | + | * Connect with your FTP backup space. Click on the ''FTP'' icon. Make a new FTP connection with a double click. |
<br> | <br> | ||
<br> | <br> | ||
| Zeile 82: | Zeile 83: | ||
<br> | <br> | ||
<br> | <br> | ||
| - | * Enter the server name of your FTP backup spaces. In addition, log on to your FTP username and FTP password. This data can be found from the customer service center: [[Kundencenter_Server_FTP_Backup#FTP-Backup-Accounts|Benutzerdaten FTP-Backup]]. You can also use a name to the FTP connection. This is useful if you create | + | * Enter the server name of your FTP backup spaces. In addition, log on to your FTP username and FTP password. This data can be found from the customer service center: [[Kundencenter_Server_FTP_Backup#FTP-Backup-Accounts|Benutzerdaten FTP-Backup]]. You can also use a name to the FTP connection. This is useful if you create multiple FTP connections. |
<br> | <br> | ||
<br> | <br> | ||
| Zeile 90: | Zeile 91: | ||
<br> | <br> | ||
<br> | <br> | ||
| - | * Now you are connected to your FTP server. | + | * Now you are connected to your FTP server. The left explorer window shows the FTP server and the right explorer window shows your server. Now you can create a backup of your documents in the users folder. Set a folder on your FTP backup space by moving your files. |
<br> | <br> | ||
<br> | <br> | ||
| Zeile 104: | Zeile 105: | ||
<br> | <br> | ||
<center> | <center> | ||
| - | [[Datei:freecommander5.png|thumb|572px|The folders | + | [[Datei:freecommander5.png|thumb|572px|The folders has been moved to the backup folder.]] |
</center> | </center> | ||
<br> | <br> | ||
| Zeile 110: | Zeile 111: | ||
These files can be recorded again after a re-install of the server, on the basis of problems. Thus, your personal files and settings will not be lost. | These files can be recorded again after a re-install of the server, on the basis of problems. Thus, your personal files and settings will not be lost. | ||
| - | |||
| + | ==== Restoring a backup to FTP backup ==== | ||
| + | To restore a backup of your personal settings, proceed as follows: | ||
| + | |||
| + | * Connect with your FTP backup space. Click on the ''FTP'' icon. Make a new FTP connection with a double click. | ||
| + | <br> | ||
| + | <br> | ||
| + | <center> | ||
| + | [[Datei:freecommander1.png|thumb|572px]] | ||
| + | </center> | ||
| + | <br> | ||
| + | <br> | ||
| + | * Enter the server name of your FTP backup spaces. In addition, log on to your FTP username and FTP password. This data can be found from the customer service center: [[Kundencenter_Server_FTP_Backup#FTP-Backup-Accounts|Benutzerdaten FTP-Backup]]. You can also use a name to the FTP connection. This is useful if you create multiple FTP connections. | ||
| + | <br> | ||
| + | <br> | ||
| + | <center> | ||
| + | [[Datei:freecommander2_1.png|thumb|572px]] | ||
| + | </center> | ||
| + | <br> | ||
| + | <br> | ||
| + | * Now you are connected to your FTP server. The left explorer window shows the FTP server and the right explorer window shows your server. Now you can copy your backup of your documents to your server. Choose your backup folder in the left explorer window and move these to your server (right explorer window). | ||
| + | <br> | ||
| + | <br> | ||
| + | <center> | ||
| + | [[Datei:freecommander4.png|thumb|572px|Picking the backup folder.]] | ||
| + | </center> | ||
| + | <br> | ||
| + | <br> | ||
| + | <center> | ||
| + | [[Datei:freecommander5_1.png|thumb|572px|Picking the backup files.]] | ||
| + | </center> | ||
| + | <br> | ||
| + | <br> | ||
| + | |||
| + | === Creating and restoring a backup on the BackupHD/online hard drive === | ||
| + | ==== Creating a backup on the BackupHD/online hard drive ==== | ||
To make a backup of your personal settings, proceed as follows: | To make a backup of your personal settings, proceed as follows: | ||
| - | * Connect with your BackupHD. Click on the ''FTP'' icon. | + | * Connect with your BackupHD. Click on the ''FTP'' icon. Create a new FTP connection with a double click. |
<br> | <br> | ||
<br> | <br> | ||
| Zeile 122: | Zeile 157: | ||
<br> | <br> | ||
<br> | <br> | ||
| - | * | + | * Enter the name of your online rsync server hard drive. In addition, log on to your FTP username and FTP password. This data can be found in the customer service center: [[BackupHD/Onlinefestplatte|Benutzerdaten BackupHD]]. Note: rsync of your BackupHD has to be '''active''': [[Sicherung_Dateien_auf_BackupHD_mit_Rsync|Sicherung von Dateien auf BackupHD mit Rsync]]. If the FTP connection should be encrypted via SSH, enter at the port a '''22'''. You can also use a name to the FTP connection. This is useful if you create a multiple FTP connections. |
<br> | <br> | ||
<br> | <br> | ||
| Zeile 130: | Zeile 165: | ||
<br> | <br> | ||
<br> | <br> | ||
| - | * Now you are connected to your BackupHD. | + | * Now you are connected to your BackupHD. The left explorer window shows the FTP server and in the explorer window shows your server. Now you can create a backup of your documents in the users folder. Set a folder on your FTP backup space by moving your files. |
<br> | <br> | ||
<br> | <br> | ||
| Zeile 148: | Zeile 183: | ||
<br> | <br> | ||
<br> | <br> | ||
| - | These files can be recorded again after a re-install of the server, on the basis of problems. Thus, your personal files and settings will not | + | These files can be recorded again after a re-install of the server, on the basis of problems. Thus, your personal files and settings will not getting lost. |
| + | |||
| + | |||
| + | ==== Restoring a backup on the BackupHD/online hard drive ==== | ||
| + | To restore a backup of your personal settings, proceed as follows: | ||
| + | |||
| + | * Connect with your BackupHD. Click on the ''FTP'' icon. Create a new FTP connection with a double click. | ||
| + | <br> | ||
| + | <br> | ||
| + | <center> | ||
| + | [[Datei:freecommander1.png|thumb|572px]] | ||
| + | </center> | ||
| + | <br> | ||
| + | <br> | ||
| + | * Enter the name of your online rsync server hard drive. In addition, log on to your FTP username and FTP password. This data can be found in the customer service center: [[BackupHD/Onlinefestplatte|Benutzerdaten BackupHD]]. Note: rsync of your BackupHD has to be '''active''': [[Sicherung_Dateien_auf_BackupHD_mit_Rsync|Sicherung von Dateien auf BackupHD mit Rsync]]. If the FTP connection should be encrypted via SSH, enter at the port a '''22'''. You can also use a name to the FTP connection. This is useful if you create a multiple FTP connections. | ||
| + | <br> | ||
| + | <br> | ||
| + | <center> | ||
| + | [[Datei:freecommander2_3.png|thumb|572px]] | ||
| + | </center> | ||
| + | <br> | ||
| + | <br> | ||
| + | * Now you are connected to your BackupHD. The left explorer window shows the FTP server and in the explorer window shows your server. Now you can copy your backup to your server. Choose in the left explorer window your backup folder and move these to your server (right explorer window). | ||
| + | <br> | ||
| + | <br> | ||
| + | <center> | ||
| + | [[Datei:freecommander4.png|thumb|572px|Picking the backup.]] | ||
| + | </center> | ||
| + | <br> | ||
| + | <br> | ||
| + | <center> | ||
| + | [[Datei:freecommander5_1.png|thumb|572px|Picking the backup files.]] | ||
| + | </center> | ||
| + | <br> | ||
| + | <br> | ||
== Windows start recovery == | == Windows start recovery == | ||
| - | To use this option, click on '''Windows start recovery.''' | + | To use this option, click on '''Windows start recovery.''' Here it will be checked and tried to fixed any errors and problems while starting Windows. |
<br> | <br> | ||
<br> | <br> | ||
| Zeile 163: | Zeile 232: | ||
== Repair the master boot record and boot sector == | == Repair the master boot record and boot sector == | ||
| - | To use this option, click on '''Repair the master boot record and boot sector.''' Here the start problems can be repaired by a buggy boot sector or master boot record. | + | To use this option, click on '''Repair the master boot record and boot sector.''' Here, the start problems can be repaired by a buggy boot sector or master boot record. |
<br> | <br> | ||
<br> | <br> | ||
| Zeile 214: | Zeile 283: | ||
== Memory diagnostic == | == Memory diagnostic == | ||
| - | To use this option, click on '''Memory diagnostic'''. Here you can perform a Memtest on which your main memory | + | To use this option, click on '''Memory diagnostic'''. Here you can perform a Memtest on which your main memory is checked for any errors. Click on '''Ok.''' |
<br> | <br> | ||
<br> | <br> | ||
| Zeile 225: | Zeile 294: | ||
== Registration editor == | == Registration editor == | ||
| - | To use this option, click on '''RegAlyzer registration editor.''' | + | To use this option, click on '''RegAlyzer registration editor.''' By using the registration editor, you can repair drivers and software problems, perform special system settings and edit the startup. |
<br> | <br> | ||
<br> | <br> | ||
| Zeile 234: | Zeile 303: | ||
<br> | <br> | ||
| - | = Deactivate the Windows | + | = Deactivate the Windows Rescue System = |
| - | Please note, that the server while clicking on "Rescue beenden" | + | Please note, that the server will restart again, while clicking on "Rescue beenden". To boot your server as usual in Windows, proceed as follows: |
| - | Login | + | Login into the customer server center and click on '''deactivate''' below '''rescue system''' button. |
<br> | <br> | ||
<br> | <br> | ||
| Zeile 246: | Zeile 315: | ||
<br> | <br> | ||
<br> | <br> | ||
| - | + | During the next restart, your server will start as usual. | |
Aktuelle Version vom 10:07, 26. Nov. 2015
| | Languages: |
Deutsch |
Manual Windows Rescue System
Manual Windows Rescue System
General
For server on which the operating system "Windows Server" is installed, we offer the Windows Rescue System. This system offers you tools in case of problem, for example to secure critical data or check the hard drive for viruses. To activate the Windows Rescue System, proceed as follows:
Login into the customer service center and select your server contract.
Choose "Rescue-System" in the left menu.
Choose the entry for the Windows Rescue System from the list and set the hook below
server reset. If you click activate, your server will be restarted in the Windows Rescue mode.
Connecting with the server
After about 15 minutes you can connect to the server by using VNC. In this example we use the VNC viewer from RealVNC. Enter under Server: the main IP address of your server followed by :0 or :5900 (Port of the Windows rescue system).
Click on OK. The viewer will connect to your server:
Enter your password. Please use the Default-Serverpasswort, which you can find in the customer service center below Serverdaten:
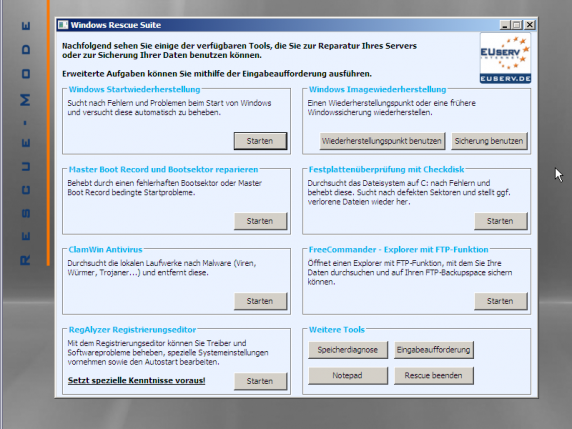
You are now successfully connected to your server and see the following screen:
The Window shows you the available options.
Options of the Windows Rescue System
FreeCommander
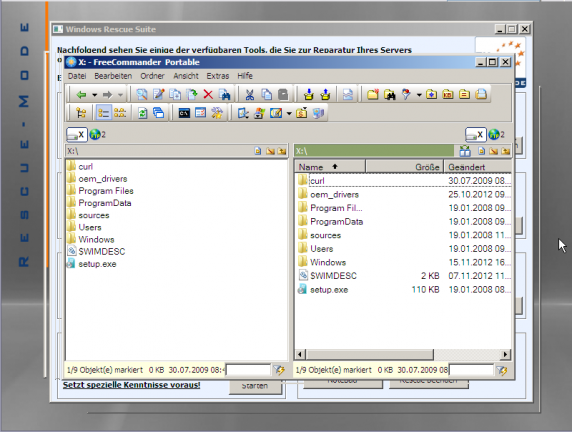
To use this option, click on FreeCommander. If you want to save some data to a remote FTP backup space, you can do this with the program FreeCommander. This tool provides an available explorer simultaneously to search your data.
Creating and restoring a backup to FTP backup
Creating a backup to FTP backup
To make a backup of your personal settings, proceed as follows:
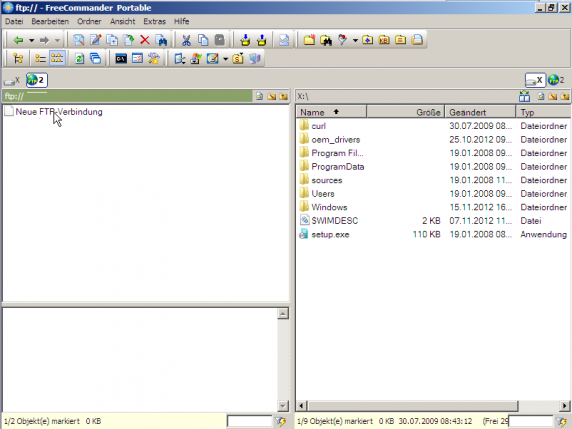
- Connect with your FTP backup space. Click on the FTP icon. Make a new FTP connection with a double click.
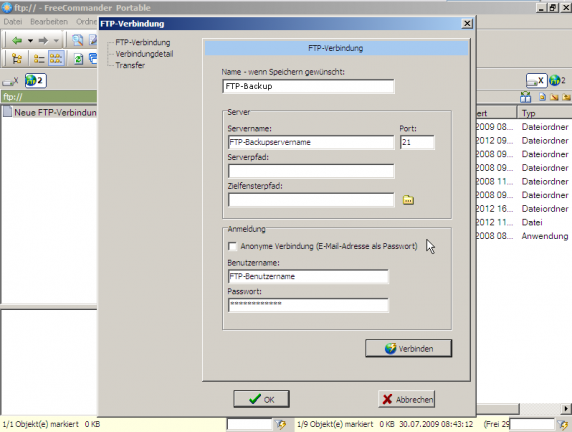
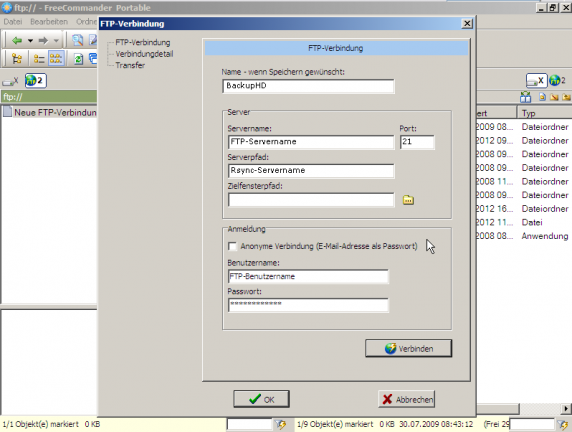
- Enter the server name of your FTP backup spaces. In addition, log on to your FTP username and FTP password. This data can be found from the customer service center: Benutzerdaten FTP-Backup. You can also use a name to the FTP connection. This is useful if you create multiple FTP connections.
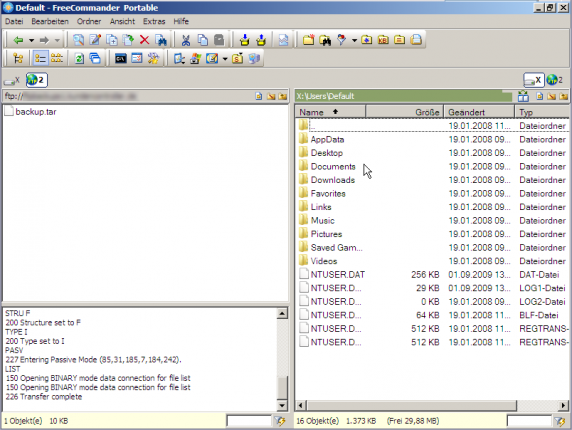
- Now you are connected to your FTP server. The left explorer window shows the FTP server and the right explorer window shows your server. Now you can create a backup of your documents in the users folder. Set a folder on your FTP backup space by moving your files.
These files can be recorded again after a re-install of the server, on the basis of problems. Thus, your personal files and settings will not be lost.
Restoring a backup to FTP backup
To restore a backup of your personal settings, proceed as follows:
- Connect with your FTP backup space. Click on the FTP icon. Make a new FTP connection with a double click.
- Enter the server name of your FTP backup spaces. In addition, log on to your FTP username and FTP password. This data can be found from the customer service center: Benutzerdaten FTP-Backup. You can also use a name to the FTP connection. This is useful if you create multiple FTP connections.
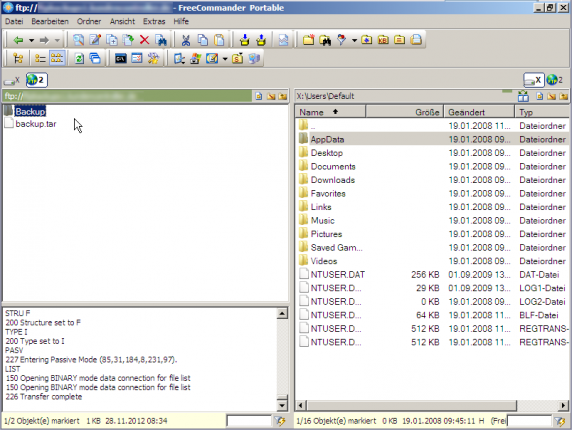
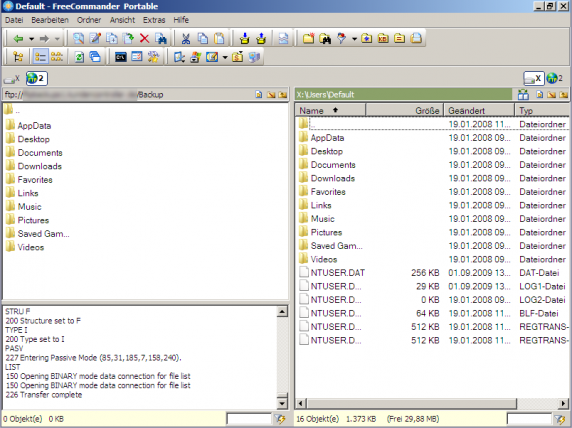
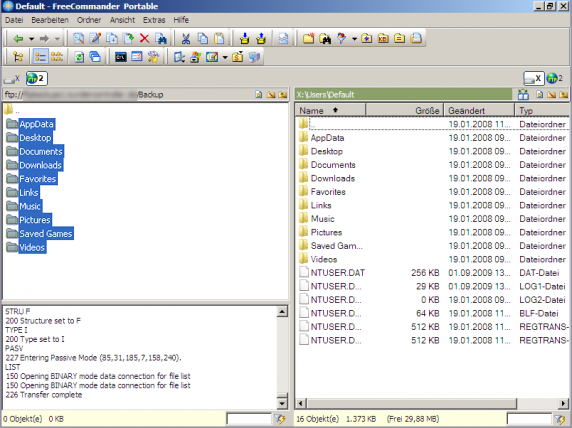
- Now you are connected to your FTP server. The left explorer window shows the FTP server and the right explorer window shows your server. Now you can copy your backup of your documents to your server. Choose your backup folder in the left explorer window and move these to your server (right explorer window).
Creating and restoring a backup on the BackupHD/online hard drive
Creating a backup on the BackupHD/online hard drive
To make a backup of your personal settings, proceed as follows:
- Connect with your BackupHD. Click on the FTP icon. Create a new FTP connection with a double click.
- Enter the name of your online rsync server hard drive. In addition, log on to your FTP username and FTP password. This data can be found in the customer service center: Benutzerdaten BackupHD. Note: rsync of your BackupHD has to be active: Sicherung von Dateien auf BackupHD mit Rsync. If the FTP connection should be encrypted via SSH, enter at the port a 22. You can also use a name to the FTP connection. This is useful if you create a multiple FTP connections.
- Now you are connected to your BackupHD. The left explorer window shows the FTP server and in the explorer window shows your server. Now you can create a backup of your documents in the users folder. Set a folder on your FTP backup space by moving your files.
These files can be recorded again after a re-install of the server, on the basis of problems. Thus, your personal files and settings will not getting lost.
Restoring a backup on the BackupHD/online hard drive
To restore a backup of your personal settings, proceed as follows:
- Connect with your BackupHD. Click on the FTP icon. Create a new FTP connection with a double click.
- Enter the name of your online rsync server hard drive. In addition, log on to your FTP username and FTP password. This data can be found in the customer service center: Benutzerdaten BackupHD. Note: rsync of your BackupHD has to be active: Sicherung von Dateien auf BackupHD mit Rsync. If the FTP connection should be encrypted via SSH, enter at the port a 22. You can also use a name to the FTP connection. This is useful if you create a multiple FTP connections.
- Now you are connected to your BackupHD. The left explorer window shows the FTP server and in the explorer window shows your server. Now you can copy your backup to your server. Choose in the left explorer window your backup folder and move these to your server (right explorer window).
Windows start recovery
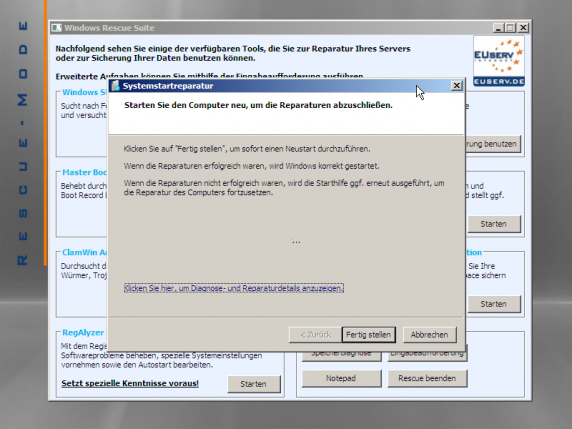
To use this option, click on Windows start recovery. Here it will be checked and tried to fixed any errors and problems while starting Windows.
Repair the master boot record and boot sector
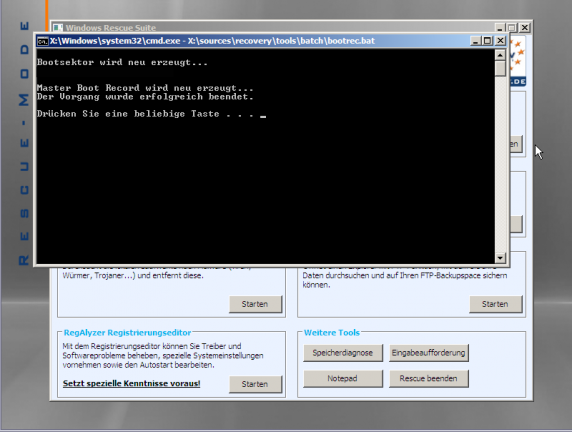
To use this option, click on Repair the master boot record and boot sector. Here, the start problems can be repaired by a buggy boot sector or master boot record.
ClamWin antivirus
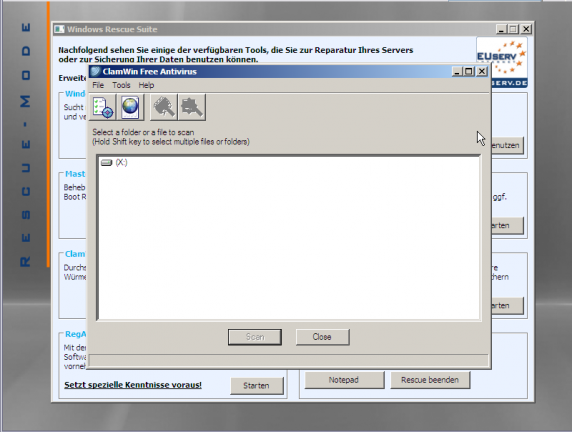
To use this option, click on ClamWin antivirus. Here you find an antivirus program that scans your local drives for malware and removes it.
Windows image recovery
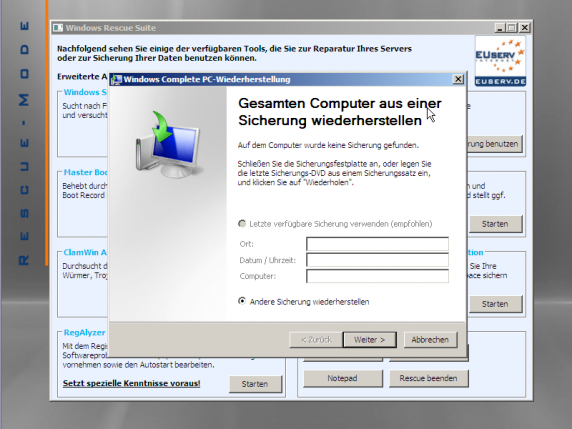
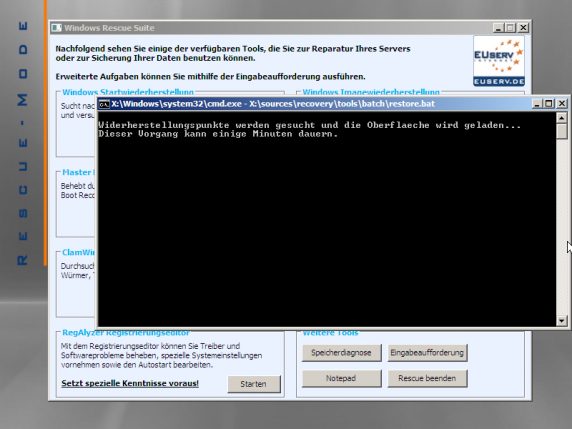
To use this option, click on Windows image recovery. Here you can restore a recovery point or an earlier applied Windows backup. To restore a recovery point, click on recovery point use. To restore a Windows backup, click on backup use.
Prompt
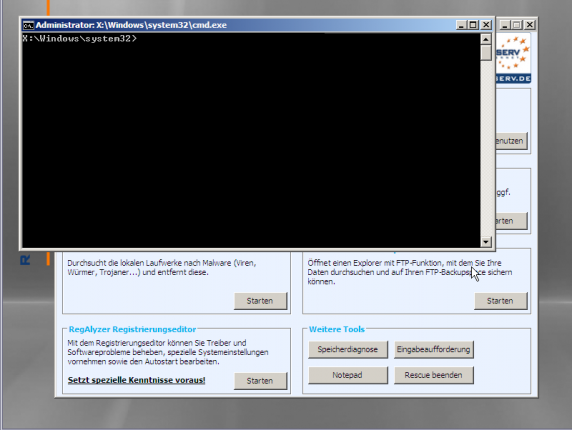
To use this option, click on Prompt. Here you can start a command line.
Memory diagnostic
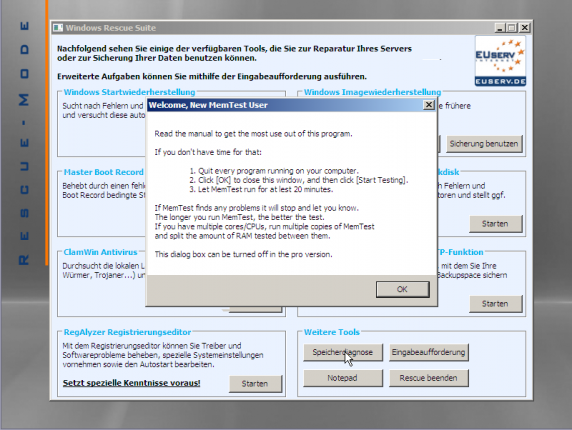
To use this option, click on Memory diagnostic. Here you can perform a Memtest on which your main memory is checked for any errors. Click on Ok.
Registration editor
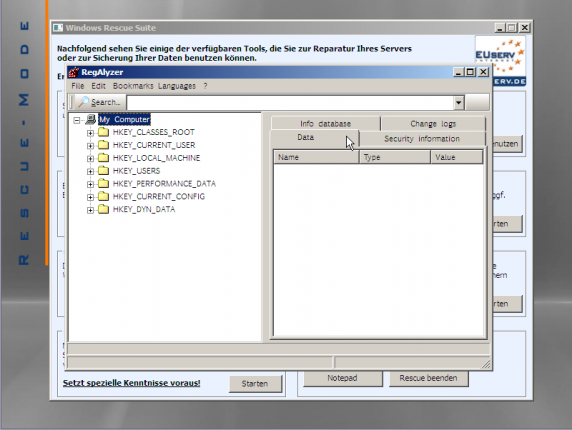
To use this option, click on RegAlyzer registration editor. By using the registration editor, you can repair drivers and software problems, perform special system settings and edit the startup.
Deactivate the Windows Rescue System
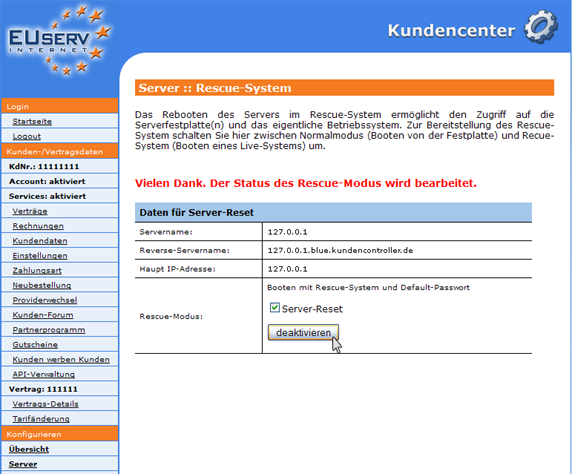
Please note, that the server will restart again, while clicking on "Rescue beenden". To boot your server as usual in Windows, proceed as follows:
Login into the customer server center and click on deactivate below rescue system button.
During the next restart, your server will start as usual.

