VKVM/en
Aus EUserv Wiki
Root (Diskussion | Beiträge) |
Almi1 (Diskussion | Beiträge) K (→Technical limitations) |
||
| Zeile 73: | Zeile 73: | ||
* A 32-Bit Windows is bootable on servers without CPU virtualization support | * A 32-Bit Windows is bootable on servers without CPU virtualization support | ||
* vKVM runs on 64-Bit architectures only | * vKVM runs on 64-Bit architectures only | ||
| + | * Hardware RAID controllers are currently not supported | ||
| + | * vKVM can't boot systems that are using virtualization technologies themselve (such as VMWare ESXi) | ||
Version vom 11:32, 11. Mär. 2013
| | Languages: |
Deutsch |
vKVM
Inhaltsverzeichnis |
vKVM
The vKVM Rescue System (virtual Keyboard/Video/Mouse) is an extended version of our standard Rescue System which loads a Linux system into your servers RAM via PXE. The vKVM Rescue System starts a virtual machine which is capable of booting from your servers hard disk. The graphical output of the VM is being transmitted over an SSL-secured VNC connection, making it possible for you to interact with your operating system "as if" you were sitting in front of your server.
The Rescue System automatically detects your hard disks and connected USB-disks, enabling you to boot from them within the VM's BIOS. The CPU will be virtualized as well. Additionally a network card is emulated which provides you access to the Internet from within the virtual machine.
vKVM Rescue is a good choice when your server isn't reachable via SSH due to a misconfiguration of your network settings (e.g. iptables) for instance. To start the vKVM Rescue System you just have to log in to the customer center, select your server contract and choose "Rescue System" from the left menu. Now select the "vKVM" entry and activate the system. The vKVM Rescue will be available after a few minutes and you can finally connect via VNC.
Please keep in mind: vKVM can only be started if there's no other rescue system active at the moment. Whether a rescue system is enabled for your server or not can be discerned by the green tick in the row Rescue-System under Serverdaten in the customer center.
Establishing a VNC connection with vKVM (Windows)
To establish a secured VNC connection with the vKVM the program SSVNC [1] is recommended.
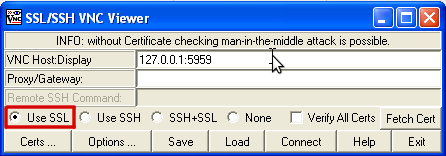
When you have started the program you should see the following window:
Under VNC Host:Display enter the IP address of your server, followed by :5959. Make sure the tick under Use SSL is set. After clicking Connect SSVNC will try to establish a connection with the server.
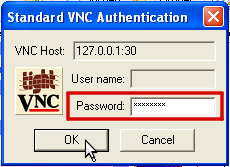
In the next step a new window will pop up, asking for your password. Just enter the Default-Passwort from the customer center and finally click OK:
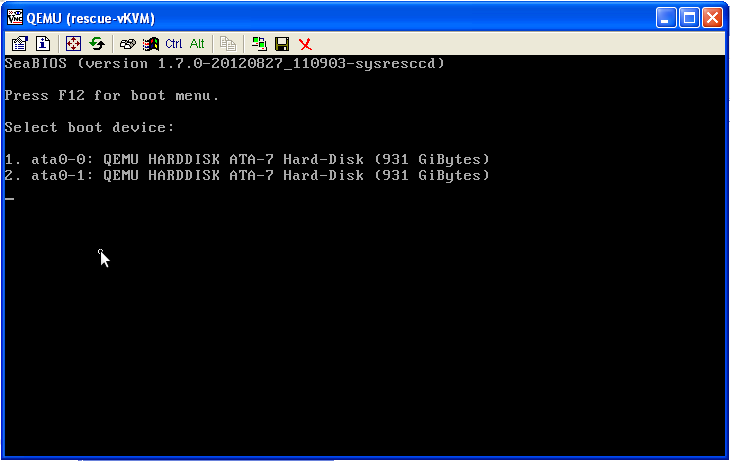
After clicking OK the authentication process will begin. You should now see the graphical output of vKVM:
By entering the respective number the vKVM will boot the selected hard drive. If you want to quit your current session make sure you have saved all your data and shut down the system properly. This turns off the vKVM and ends your session. In order to boot your server as usual trigger a webreset in the customer center.
Establishing a VNC connection with vKVM (Linux)
To establish a secured VNC connection with the vKVM the program SSVNC [2] is recommended.
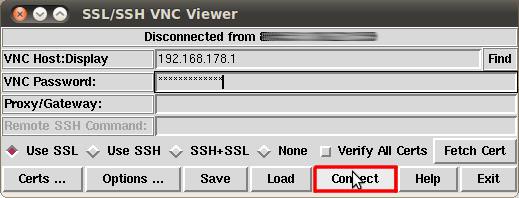
When you have started the program you should see the following window:
Under VNC Host:Display enter the IP address of your server, followed by :5959. Under VNC Password enter the password which you can find in the customer center unter "server data". Make sure the tick under Use SSL is set.
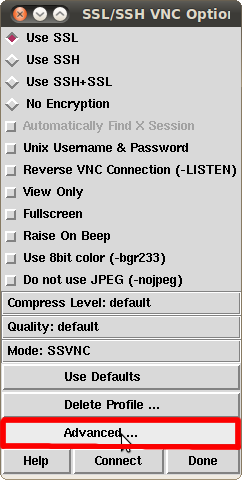
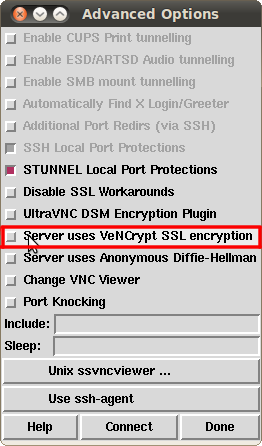
Now go to Options --> Advanced:
Make sure the tick under Server uses VeNCrypt SSL encryption is not set:
Still in the same window click Done in the lower right corner. Now you are back in the main window. Finally make sure the tick under Verify All Certs is not set and click the Connect button:
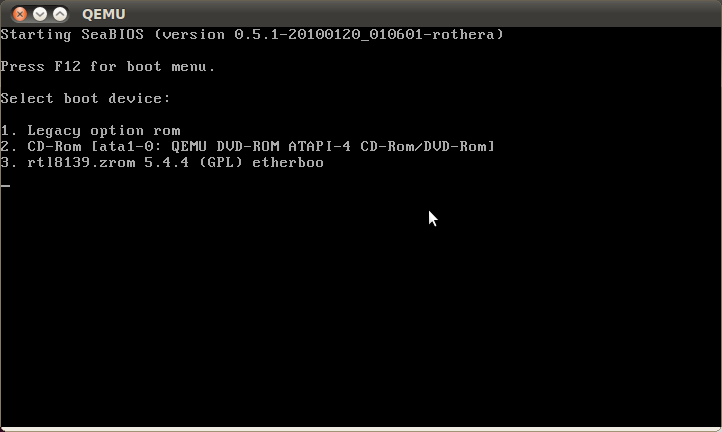
By now you should be connected with the vKVM and see a BIOS screen, prompting you to select a hard drive from which you want to boot:
By entering the respective number the vKVM will boot the selected hard drive. If you want to quit your current session make sure you have saved all your data and shut down the system properly. This turns off the vKVM and ends your session. In order to boot your server as usual trigger a webreset in the customer center.
Technical limitations
The following technical limitations are known at the moment
- vKVM runs at a low speed on servers without CPU virtualization support
- Windows (64-Bit) won't run on servers without CPU virtualization support
- A 32-Bit Windows is bootable on servers without CPU virtualization support
- vKVM runs on 64-Bit architectures only
- Hardware RAID controllers are currently not supported
- vKVM can't boot systems that are using virtualization technologies themselve (such as VMWare ESXi)

