Webmail/en
Aus EUserv Wiki
Svtr1 (Diskussion | Beiträge) |
Sufr1 (Diskussion | Beiträge) (→Deleting e-mails when the quota has been exceeded) |
||
| (Der Versionsvergleich bezieht 15 dazwischenliegende Versionen mit ein.) | |||
| Zeile 5: | Zeile 5: | ||
= Webmail = | = Webmail = | ||
== Login to the user interface == | == Login to the user interface == | ||
| - | |||
| - | To login with your email | + | === Login via the email alias === |
| + | |||
| + | To login with your email alias to the user interface of Webmail, please proceed as follows: | ||
| - | * Enter the address of the EUserv Webmail into your web browser's address bar: | + | * Enter the address of the EUserv Webmail into your web browser's address bar: https://support.euserv.com/webmail |
<br> | <br> | ||
<br> | <br> | ||
<center> | <center> | ||
| - | [[Datei: | + | [[Datei:webmail_euserv_en_login_email_alias_1.jpg]] |
</center> | </center> | ||
<br> | <br> | ||
<br> | <br> | ||
| - | * Log in with your username and password for the Webmail here. | + | * Log in with your username (red marked frame) and password for the Webmail here. |
<pre> | <pre> | ||
| - | You will find your data on the EUserv homepage http://www.euserv.de under Customer panel -> Login -> select contract -> | + | You will find your data on the EUserv homepage http://www.euserv.de under Customer panel -> Login -> select contract -> Aliases/Addresses. |
</pre> | </pre> | ||
<br> | <br> | ||
<br> | <br> | ||
<center> | <center> | ||
| - | [[Datei: | + | [[Datei:webmail2_en.png]] |
</center> | </center> | ||
<br> | <br> | ||
<br> | <br> | ||
| + | === Login via the email account === | ||
| - | + | To login with your email account to the user interface of Webmail, please proceed as follows: | |
| - | + | ||
| - | To login with your email | + | |
* Enter the address of the EUserv Webmail into your web browser's address bar: http://webmail.euserv.de. | * Enter the address of the EUserv Webmail into your web browser's address bar: http://webmail.euserv.de. | ||
| Zeile 38: | Zeile 38: | ||
<br> | <br> | ||
<center> | <center> | ||
| - | [[Datei: | + | [[Datei:webmail_euserv_en_login_email_account_1.jpg]] |
</center> | </center> | ||
<br> | <br> | ||
<br> | <br> | ||
| - | * Log in with your username and password for the Webmail here. | + | * Log in with your username (red marked frame) and password for the Webmail here. |
<pre> | <pre> | ||
| - | You will find your data on the EUserv homepage http://www.euserv.de under Customer panel -> Login -> select contract -> | + | You will find your data on the EUserv homepage http://www.euserv.de under Customer panel -> Login -> select contract -> Email-Accounts. |
</pre> | </pre> | ||
<br> | <br> | ||
<br> | <br> | ||
<center> | <center> | ||
| - | [[Datei: | + | [[Datei:webmail2_en.png]] |
</center> | </center> | ||
<br> | <br> | ||
<br> | <br> | ||
| + | |||
== Functions == | == Functions == | ||
| - | + | === Writing an email === | |
| - | + | * Click on the icon 'Create a new messsage' | |
| + | |||
| + | <br> | ||
| + | <br> | ||
<center> | <center> | ||
| - | [[Datei: | + | [[Datei:webmail3_en.png]] |
</center> | </center> | ||
| - | + | <br> | |
| + | <br> | ||
| - | Enter the message you want to send into the big text field. | + | * Enter the recipent into the text field below. |
| + | * Enter your eMail's subject. | ||
| + | * Enter the message you want to send into the big text field. | ||
| + | <pre> | ||
With the icons above you can send the eMail, check the spelling, append a file, append a signature, save the message and choose further options. | With the icons above you can send the eMail, check the spelling, append a file, append a signature, save the message and choose further options. | ||
| + | </pre> | ||
| - | + | * In order to send the message either click the '''Send now''' button. | |
| - | |||
| - | + | === Address book === | |
| - | + | * Click on the address book icon which creates an address book for you. | |
| + | <br> | ||
| + | <br> | ||
<center> | <center> | ||
| - | [[Datei: | + | [[Datei:webmail4_en.png]] |
</center> | </center> | ||
| - | + | <br> | |
| - | < | + | <br> |
| - | + | ||
| - | < | + | |
| - | + | ||
| - | + | * Create a new contact by selecting the icon above the contact overview. | |
| + | <br> | ||
| + | <br> | ||
<center> | <center> | ||
| - | [[Datei: | + | [[Datei:webmail5_en.png]] |
</center> | </center> | ||
| - | + | <br> | |
| + | <br> | ||
| - | |||
| - | + | === Filter function === | |
| - | + | You can create, change, deactivate or delete filters with the filter function of Webmail. | |
| - | + | ||
| - | + | ||
| - | + | ||
| - | + | ||
| - | + | ==== Creating filters ==== | |
| - | + | ||
| - | + | ||
| - | + | ||
| - | + | ||
| - | + | TO create a new filter, please proceed as follows: | |
| - | + | * Log in to https://support.euserv.com/webmail with your username and password for the EUserv Webmail. | |
| - | + | * Click on the '''Settings''' icon on the top right. | |
| - | + | * Click on the tab '''Filters'''. Here you can add new filters. | |
| - | + | <br> | |
| - | + | <br> | |
| - | Log in to | + | |
| - | + | ||
| - | + | ||
<center> | <center> | ||
| - | [[Datei: | + | [[Datei:filter1_en.png]] |
</center> | </center> | ||
| - | + | <br> | |
| - | + | <br> | |
| - | + | * Click on the '''+''' button on the bottom left to create a new filter. | |
| + | * Assign a name to the filter. | ||
| + | <br> | ||
| + | <br> | ||
<center> | <center> | ||
| - | [[Datei: | + | [[Datei:filter2_en.png]] |
</center> | </center> | ||
| - | + | <br> | |
| + | <br> | ||
| + | * Choose between '''matches all of the following rules, matches any of the following rules''' and '''all messages'''. | ||
| + | * Save your filter by clicking on the '''Save''' button. | ||
| - | + | ==== Changing filters ==== | |
| - | + | To change or deleting your filter rules, please proceed as follows: | |
| - | + | * Go to the filter rule you want to delete. | |
| + | * Click on the '''Trash''' icon. | ||
| + | * Click on the '''Save''' button to save your changes. | ||
| - | |||
| - | |||
| - | |||
| - | |||
| - | |||
| - | + | ==== Disabling filters ==== | |
| - | + | It's also possible to switch off your created filter. Please proceed as follows: | |
| + | |||
| + | * Select the option '''Disable rule''' on the top right. | ||
| + | <br> | ||
| + | <br> | ||
| + | <center> | ||
| + | [[Datei:filter3_en.png]] | ||
| + | </center> | ||
| + | <br> | ||
| + | <br> | ||
| + | * Click on the '''Save''' button to save your changes. | ||
| - | |||
== Deleting e-mails when the quota has been exceeded == | == Deleting e-mails when the quota has been exceeded == | ||
| Zeile 149: | Zeile 159: | ||
If the quota (maximum amount of storage space for e-mails) of your respective webspace or mail plan has been exceeded, it is not possible to delete your E-Mails under Webmail anymore. In this case please proceed as follows: | If the quota (maximum amount of storage space for e-mails) of your respective webspace or mail plan has been exceeded, it is not possible to delete your E-Mails under Webmail anymore. In this case please proceed as follows: | ||
| - | * Enter the address of the EUserv Webmail in your web browser: | + | * Enter the address of the EUserv Webmail in your web browser: https://support.euserv.com/webmail |
* Log in with your e-mail account's username and password | * Log in with your e-mail account's username and password | ||
* Select “Personal Settings” from the upper menu | * Select “Personal Settings” from the upper menu | ||
Aktuelle Version vom 10:24, 6. Sep. 2016
| | Languages: |
Deutsch |
Webmail
Inhaltsverzeichnis |
Webmail
Login to the user interface
Login via the email alias
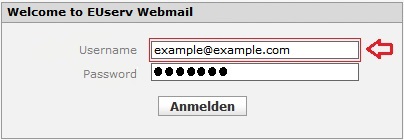
To login with your email alias to the user interface of Webmail, please proceed as follows:
- Enter the address of the EUserv Webmail into your web browser's address bar: https://support.euserv.com/webmail
- Log in with your username (red marked frame) and password for the Webmail here.
You will find your data on the EUserv homepage http://www.euserv.de under Customer panel -> Login -> select contract -> Aliases/Addresses.
Login via the email account
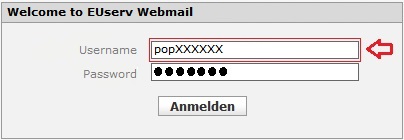
To login with your email account to the user interface of Webmail, please proceed as follows:
- Enter the address of the EUserv Webmail into your web browser's address bar: http://webmail.euserv.de.
- Log in with your username (red marked frame) and password for the Webmail here.
You will find your data on the EUserv homepage http://www.euserv.de under Customer panel -> Login -> select contract -> Email-Accounts.
Functions
Writing an email
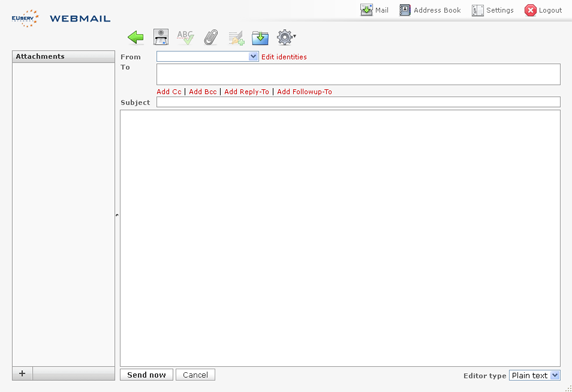
- Click on the icon 'Create a new messsage'
- Enter the recipent into the text field below.
- Enter your eMail's subject.
- Enter the message you want to send into the big text field.
With the icons above you can send the eMail, check the spelling, append a file, append a signature, save the message and choose further options.
- In order to send the message either click the Send now button.
Address book
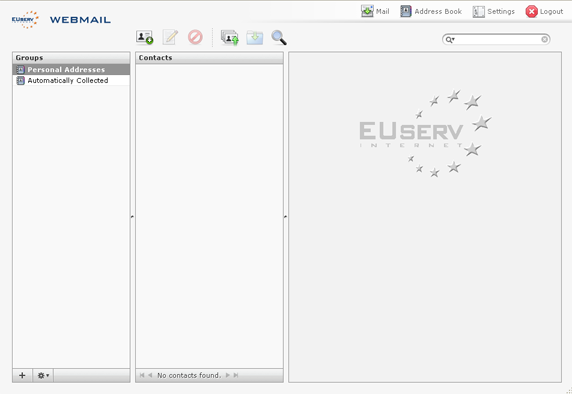
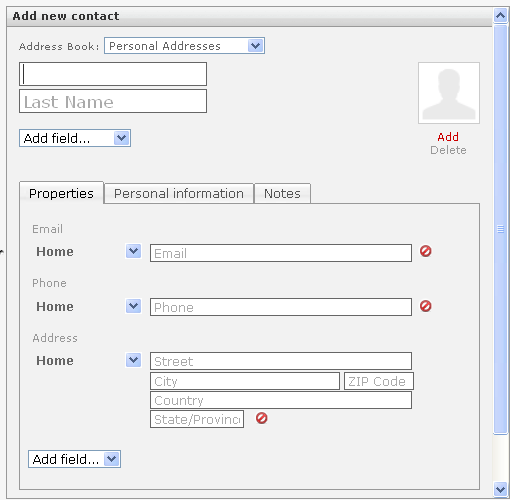
- Click on the address book icon which creates an address book for you.
- Create a new contact by selecting the icon above the contact overview.
Filter function
You can create, change, deactivate or delete filters with the filter function of Webmail.
Creating filters
TO create a new filter, please proceed as follows:
- Log in to https://support.euserv.com/webmail with your username and password for the EUserv Webmail.
- Click on the Settings icon on the top right.
- Click on the tab Filters. Here you can add new filters.
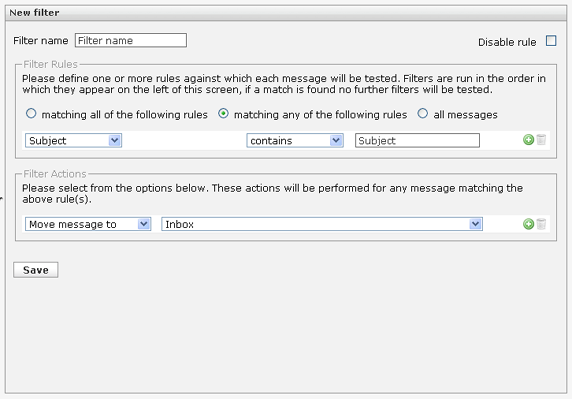
- Click on the + button on the bottom left to create a new filter.
- Assign a name to the filter.
- Choose between matches all of the following rules, matches any of the following rules and all messages.
- Save your filter by clicking on the Save button.
Changing filters
To change or deleting your filter rules, please proceed as follows:
- Go to the filter rule you want to delete.
- Click on the Trash icon.
- Click on the Save button to save your changes.
Disabling filters
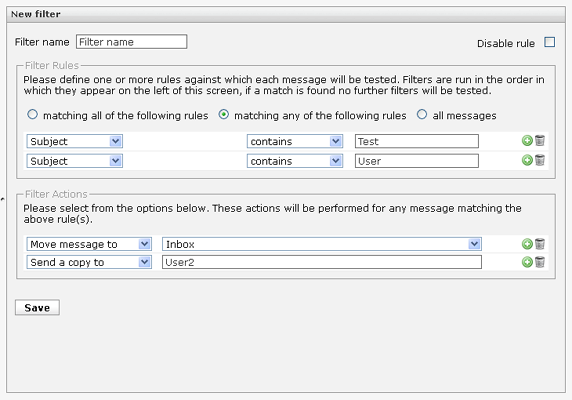
It's also possible to switch off your created filter. Please proceed as follows:
- Select the option Disable rule on the top right.
- Click on the Save button to save your changes.
Deleting e-mails when the quota has been exceeded
If the quota (maximum amount of storage space for e-mails) of your respective webspace or mail plan has been exceeded, it is not possible to delete your E-Mails under Webmail anymore. In this case please proceed as follows:
- Enter the address of the EUserv Webmail in your web browser: https://support.euserv.com/webmail
- Log in with your e-mail account's username and password
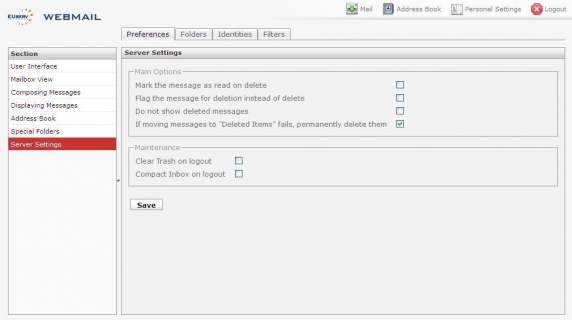
- Select “Personal Settings” from the upper menu
- Click “Server Settings” and check the field “If moving messages to 'Deleted Items' fails, permanently delete them”
- Finally, click the “Save” button to apply these settings
Please contact the support under support@euserv.de if the problem still occurs.

