Manual Supermicro KVM/en
Aus EUserv Wiki
| | Languages: |
Deutsch |
Supermicro-KVM
Inhaltsverzeichnis |
Supermicro-KVM
General
Servers with an OnBoard KVM are deployed with the KVM/IPMI functions integrated in the SuperMicro server boards. To use the KVM for your server, you can book this option under "Pro-Option" in the customer center. The EUserv support subsequently sends you an eMail containing all the KVM access data necessary.
Connecting with the KVM
In your browser's address bar enter the KVM's IP address and log in using the access data. All the data can be found in the mail you just received from the EUserv support.
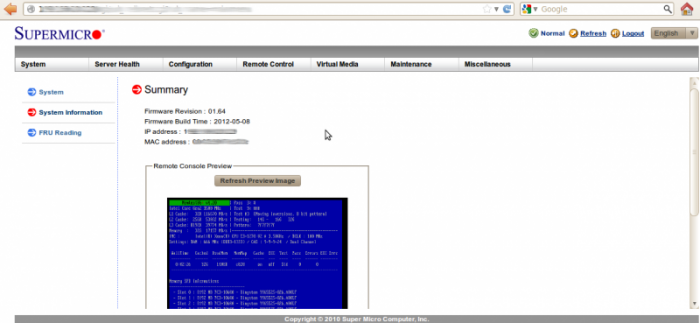
You will now see the following screen as well as a preview of your servers graphical output below:
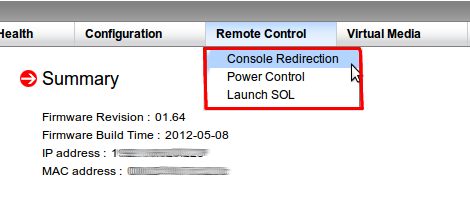
To interact with the KVM you need to call up the console. To do so just click Remote Control --> Console Redirection from the menu bar:
Click the "Launch Console"' button - this opens up a new window, showing you the graphical output of your server, allowing you to interact with it by using your keyboard and mouse.
If you don't need the KVM anymore please log out by clicking "Logout" in the upper right corner:
KVM options
Configuring the mouse
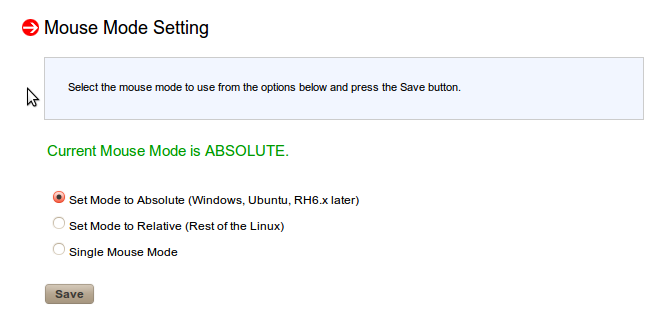
Since the IPMI interface of the KVM is conceived OS-independent it can be necessary to configure detection of the mouse. To this, go to Configuration --> Mouse Mode and choose the appropriate setting which fits your locally installed OS. Save the changes by clicking Save.
Mounting virtual media
Choosing the boot medium
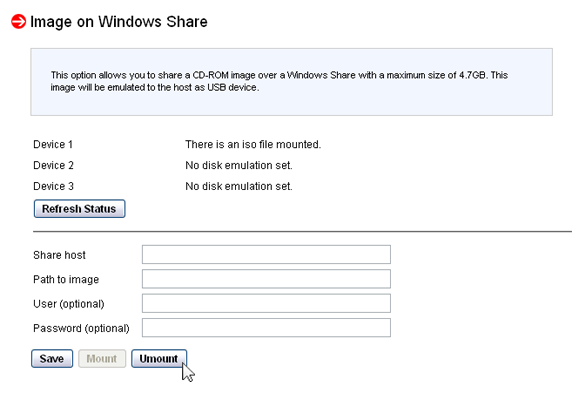
The Supermicro KVM offers the opportunity to emulate CD and floppy images on a Windows share (or Samba server) as USB devices on your server. This feature for example allows you to install a rather "exotic" operating system which is not contained in the EUserv OS list.
An overview of the available ISO files you can find here:
To mount a virtual medium please proceed as follows:
- Go to Virtual Media in the menu bar.
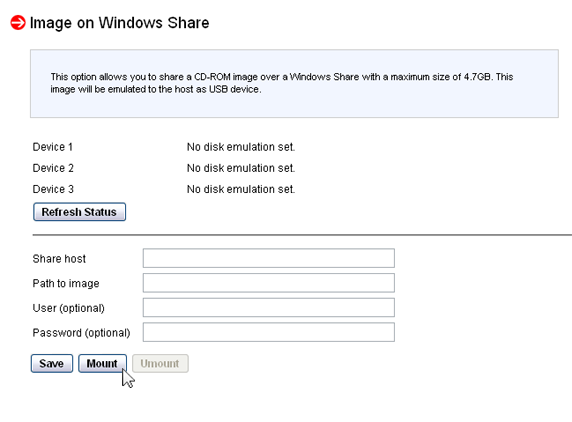
- Choose CD-Rom Image:
- Under Share host enter the hostname or IP address of your share
- Under Path to image enter the path to the image
- Under User enter your user name (optional).
- Under Password enter your password (optional).
- Click on Save.
- Click on Mount.
The image should by now be mounted (indicated by a status message).
To start the server with the boot medium, please perform a server reboot. How to perform a server reset can be found in the following section:
After that choose the boot medium. How to choose the boot medium can be found here:
Application example with ISO list
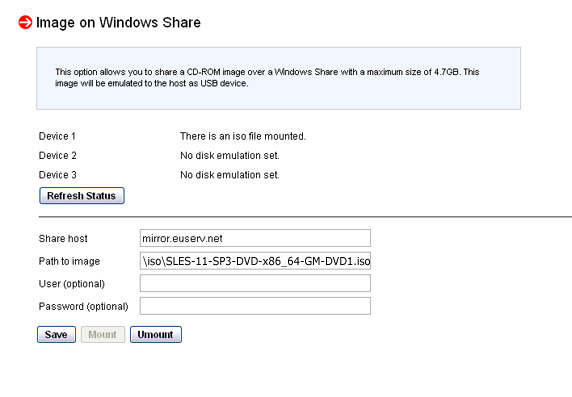
The EUserv Mirror server already contains some ISO images of different Linux distributions. In the following section we will explain how to mount an ISO image (here: SUSE Linux Enterprise Server).
- Go to Virtual Media in the menu bar.
- Choose CD-Rom Image:
- Under Share host enter the following hostname: mirror.euserv.net.
(Note: Please use the IPv4 address of the host if your mount was not successful.) - Under Path to image enter the following path to the image: \iso\SLES-11-SP3-DVD-x86_64-GM-DVD1.iso.
- The field User should be blank.
- The field Password should be blank.
- Click on Save.
- Click on Mount.
The image should by now be mounted (indicated by a status message).
To start the server with the boot medium, proceed as follows:
- Perform a server reboot. How to perform a server reset can be found in the following section:
- Go to Remote Control in the menu bar.
- Choose Launch SOL.
- Click on Launch SOL.
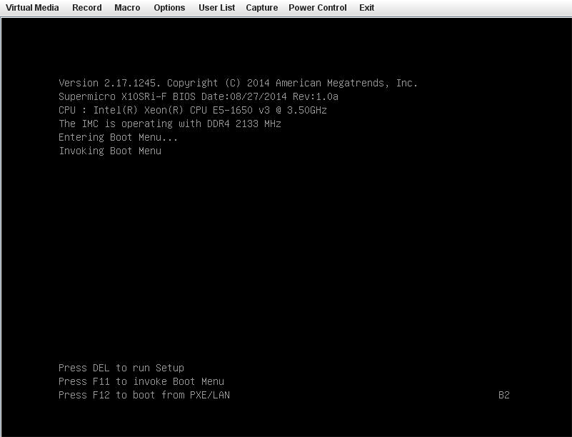
- Press F11 repeatedly.
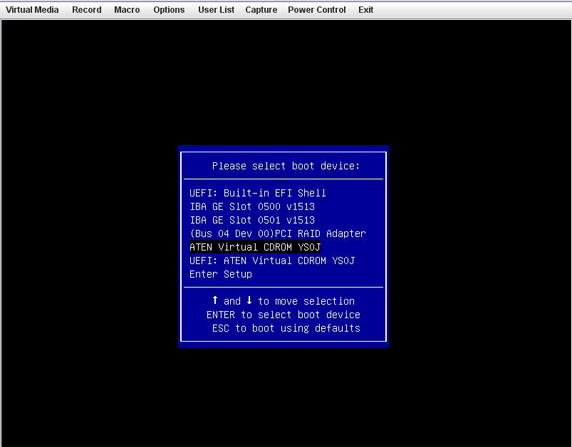
- Choose the following boot medium: ATEN Virtual CDROM YS0J.
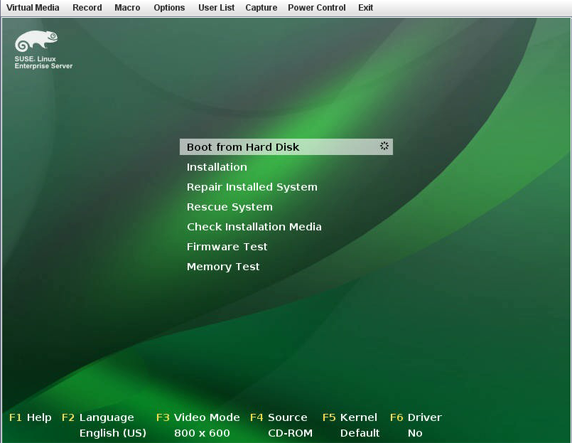
Now you can see the setup screen of SUSE Linux Enterprise Server.
Application example via CIFS at own Backup-Storage
Below we will show you how to integrate your own ISO image, which is located on the backup storage. This feature is only available if backup storage with CIFS is supported by the contract and CIFS is enabled in the customer control panel -> BackupFTP for at least 30 minutes with a maximum of 8 characters password.
- Go to Virtual Media in the menu bar.
- Choose CD-Rom Image:
- Under Share host enter the hostname that is displayed for CIFS in customer panel: cifs<XXX>.kundencontroller.de.
(Note: Please use the IPv4 address of the host if your mount was not successful.) - Under Path to image enter the following path to the image: \<Your-Backupftp-Accountname>\<YourISO-Filename>.iso.
- Fill the field User with your Backupftp-Accountname.
- Fill the field Password with your password. (Max. 8 characters are allowed as password!)
- Click on Save.
- Click on Mount.
The image should by now be mounted (indicated by a status message).
Proceed further als already described above.
Unmounting the boot medium
Unmounting the image can be done by selecting Unmount and confirming with Save.
Power Control
The "Power Control" feature allows you to switch on/off or restart your server. This can be done by clicking Remote Control --> Power Control from the menu bar. You can now observe the current state of your server (e.g. "Host is currently on"). You'll now have the following options:
| Reset Server | Conducts a restart |
| Power Off Server - Immediate | Immediately turns off the server |
| Power Off Server - Orderly Shutdown | Turns off the server orderly |
| Power On Server | Turns on the server |
| Power Cycle Server | Turns off the server |
Reading the system state
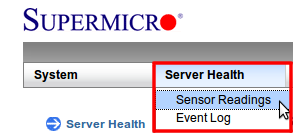
You can check for the system critical values of your server anytime. Besides the CPU temperature, system temperature and fan speed several voltage values are displayed. The values are displayed colr-coded (green - orange - red), thus informing you about the state of the server. The system state can be found under Server Health --> Sensor Readings.
Console options
Recording a KVM session
You can record your KVM session as *.AVI videos. Recording a video is achieved by doing the following:
Within the console click Record and then Start Recording. A windows pops up, prompting you to state the file path where the video is supposed to be saved. After this you finally have to set the resulting videor esolution. Recording of the session now begins. To stop recording click Record and Stop Recording
Keyboard Macros
The KVM also features keyboard macros. Click Macro in the console. Here you can determine whether the Windows or Alt key shall be pressed, for instance. The submenu "Macro" provides common shortcuts such as Ctrl+Alt+Del which can be send to the server.
Moreover it's possible to assign certain KVM specific commands to custom keys. Let's assume you need the macro Ctrl+Alt+Del more often and want to assign it to F7.
In the console go to Options --> Hotkey Settings and click Start. From the action column select Send Ctrl+Alt+Del. Now press F7 and click Stop and finally Assign. After clicking Close each time you press F7 within the console, a Ctrl+Alt+Del will be send to the server.
Changing the language
Configuring the display language of the KVM is done by clicking Options --> Preference --> Language Setting within the console and choosing the desired language. After confirming with OK the display language will be changed.
Fullscreen
In case you want full-screen display of the KVM you need to do the following:
- In the menu bar click Options --> Full-Screen Mode
- To return to the normal mode move your mouse to the upper edge of the screen and choose Options --> Leave Full Screen Mode
For Linux users
In case you get the following error message when starting the KVM in your browser:
no iKVM64 in java.library.path
you can fix this by doing the following:
Change to your download folder and look for a file labeled "launch.jnlp". Open this file in an editor and search the entry:
<resources os="Linux" arch="amd64">
  <nativelib href="liblinux_x86_64.jar" download="eager" version="1.0.3"/>
</resources>
It's important to find the correct entry for your processor architecture (in this case "amd64" for 64 bit). When you have located the entry paste the following lines between <nativelib ... /> and </resources>:
  <property name="jnlp.packEnabled" value="true"/>
  <property name="jnlp.versionEnabled" value="true"/>
Save the file, right-click on it and open it in a browser or (if installed) the "IcedTea Java Web Start" for example.
Note: This has been tested successfully under Ubuntu 10.04 and 12.04.
Characteristics / limitations / security
The access to KVM is protected with a firewall by default. All TCP/UDP ports and ICMP are blocked except the following port:
- SSL (TCP 443)
If you need a special port for access, please contact our support via a request in the customer panel and describe exactly for what you will need this port.
You don't have access to the BIOS. You can not make changes oder settings in the BIOS.

